Showing posts with label card. Show all posts

Friday, November 9, 2012

Ornament score!

I has this idea in mind and actually found the perfect item. I was in the Dollar Store and found these ornaments that have a hand-made look, but yet they were flat (which was exactly what I was looking for) and a deal at 4 for a dollar.
Here is another style I picked up too.
I think these will be flat enough to mail in an oversized envelope. The card I am making is a 4 x 5 size. I designed a little pocket on the inside for the ornament to go in.

The stamps are from My Thoughts Exactly. The paper is by Me & My Big Ideas and Jolly Holiday by Recollections. This one I did a ribbon all the way around to tie off the card.

I did two variations of the inside. This one just closes.
Now I have a set of Christmas cards done and even have a little ornament to send with it to remind our friends of us.

I hope you find some inspiration with these cute little ornament cards.

Thanks for coming by, ~Ima Cutter  (Trish)

Monday, October 29, 2012

Thank you cut out card

I like it when I can double my effort. I made this cut out card file and used two tones of cardstock.The design is pretty simple. I like the contrast of purple and grey the colors. I like it when a project goes together quickly.


The cardstock is Recollections. The glitter tape is from Michael's. The brads are from Eyelet Outlet. The ribbon is from the Flower Factory. I am not sure where the flourish came from. I think it is one I traced from an online search. You could use about any design you like there.

Thanks for stopping by,
Ima Cutter

Friday, October 26, 2012

Tea light card combo #2


I have another tea light card combo, but this one is different. It was another file share from the MTC forum. Who needs to but files when there are so many awesome freebies? This one is from Ginger.

The stamp is from Michael's. The paper is from Colorbok. The cardstock is Recollections. The card had a ribbon that goes around it to close it on the right side with a bow. The inside is where it gets really fun.
The card holds six tea light candles. I covered it with a vellum sheet. The left side holds a tag for your message or another stamp. I think this file will also make it on my list of favorites for telling someone a special thanks.

Happy Crafting~ Ima Cutter

Friday, October 5, 2012

I do, I do

Here's an anniversary card I did my hubby to celebrate our 28 years together!


The paper is from Femme Fatale by Recollections. I found the little rings in a set at Michaels. The ribbon came from there too. The flowers are from some silk flowers I took apart. The rhinestones are from the eyelet outlet.

I hope for another 28 years. <3
Ima Cutter- Trish

Friday, September 28, 2012

Ooh La La

Here's a little birthday card I did for my oldest daughter who has grown to adult WAY too quickly. She will be graduating from college this year.=O I know I just can't be old enough to have a kid that old. We don't get to celebrate with her since she in in another state right now.


The little french guy is from Lettering Delights.
The twine is Trendy Twine.
The stamps are from MyThoughtsExactly.
The flourish is my own design.

Hope you have a happy day that is full of inspiration and smiles.

Thanks,
Ima Cutter- Trish


Friday, August 10, 2012

Crabby card

Hi all,

I wanted to share a card I did for the MTC challenge designer feature which is sharing the talents of Jani Lewis at PaperCompulsions.com. Jani provided an adorable little crab set. I used them both.

The challenge runs through Sunday.

I couldn't leave the inside blank. So I used the other crab file to get my message across.


The theme is perfect for summer! I added a light house brad to the scene ond covered it on the inside with the bucket.=D

Thanks for stopping by.
Ima Cutter

Tuesday, June 12, 2012

My 3-in-1


Here is a little box I call my 3- in- 1. It serves as a card, a gift box, and part of the gift itself.

Here's what it looks like closed up. I still want to add a few sentiments to it and my personal message. I made the rose our of fabric.


When you open the box, I have thank you and a little flourish.


Then you get to where I will put my personal message below the key. The paper is from DCWV's all dressed up. So the base of the box is basically like a great big matchbox. I added a wrap the folds over to be my card part. I love this little box. It could hold so many goodies in it.  What will I put in mine? I will show you in my next post.


Thanks so much for stopping by to look  at my project. This will be a gift for a special friend.=D
I would use this box to store something in if I got something like this. This would be just too useful to throw away.

Blessings~
Trish

Wednesday, May 30, 2012

Song in my heart

 Do you love free files? Well, here is one I just love that was a freebie from one of the MTC challenges we have twice a month on the forum/ This card wasn't a challenge entry. I just love the file so much I wanted to just make an awesome card. 


This file is made by MichelleMyBelle who does amazing work. Here is a link to her site so you can follow it to where you can find the file in case you'd like to have it for yourself. I used embossed vinyl on the flap part of the card The dictionary word is a freebie from the scrappincop.


 The music note and Fleur-di-lis are brads. I am not sure where the flourish came from, but I don't think it is one I made. Here is the link to Michelle's blog to see her take on the card, plus you can get the link to the free file on her site. Thanks, Michelle!
http://michellemybellescreations.blogspot.com/2012/02/mtc-challenge-featuring-kristi-dailey_13.html

Friday, May 25, 2012

Cascading card

I love it when I come across something I haven't seen before let alone something I think, "I can make that!" We'll I found this card called a cascade card.I found my inspiration here:
http://www.frenchiestamps.com/2012/02/cascading-card-easy-way.html

I watched her video and made my own cut file. The concept is really easy; the cut file makes it so simple. I used an regular size piece of cardstock that was printed on one side. The paper is Recollections. I thought I better get a picture of this stage before I went too far in my assembly. Here is the plain side. One has cuts on the top edge the other has cuts on the bottom edge. The folds and cut lines are already in the cut file so the tricky part is already done for you. =D


The two parts slide together. One side slides down over top of the other. The slits will let you know which one is which.

 
I like the contrast of the printed and plain side of the paper. Here is the basic front view of the card if it is folded flat, but wait, the cool part is how you can display it.

 You'll need to add a piece to either the front or the back to stabilize and and hold the two sections together. The sentiment is from the mini thoughts set from www.mythoughtsexactly.co  I put mine in the back because I didn't want to mess up my pattern. I really like the alternating zebra print.

I plan to put my message on the back. Here are the side views to get some ideas on what to do with them. With the printed paper it is like the card has two different looks depending on how you look at it.
Now for some fun. My followers can get this  cut file for free. Your name must show up as a follower in the list, OR I must be able to see that you follow me when you leave a comment if I click on your name. (I know there were a few of you that were followers but didn't show in the follower section.)  I am trying to build up my followers so this is a special offer just for them. Maybe you might want to be a follower too?? If you get a chance to make one of my files, please let me know or link to my blog.=D

My file freebie will be emailed. Some of you I should have an email for. If in doubt, leave it. The freebie will be open through Sunday night May 28th, I have a grad party to put on so I may need a few days to get them all emailed out. I won't get to this until Tuesday. If you need to contact me here is my email address trishh@wans.net. I will send this out as an MTC file unless you let me know you need an SVG file.

I appreciate all the encouraging comments. Thanks for coming by!!
Blessings,
Trish (ImaCutter)

Monday, May 21, 2012

Get Punked

I have seen the style trend of steampunk grow slow and steady. I like the juxtaposition of the elements of vintage and sci-fi. I had created this file but didn't have a chance to cut it and since then have seen a few articles on steampunk. I did this for a card for my son's graduation. I wanted something masculine and trendy.

I tried to add a few details to the card. One is that the front is shaped and follows the outline of the gears on the front.
I also took the stencil kind of shape from the gears and used it to ink some shadowy gears on the inside. Some of these you see from the front view.
I also took a shadow layer of the group of gears and put that on the inside for some interest.

I am going to add a gear with the inside sentiment to layer on top of this. Something like- "To start your future." I made the clock and the gears in MTC using basic shapes I was able to get the clock all as one piece with the exception of three I's that I had to glue separately.

I hope you enjoyed the card and maybe you'll find a way to get punked!

Thanks for stopping by!
Trish (ImaCutter)


Sunday, May 20, 2012

FROG engraving

I want to share my first attempt at engraver with my Zing. I bought the engraver from Amy Chomas. It fits great in the Zing holder.  I had some craft copper that I  have had forever. I think I'll have to mess with it a little more to push the envelope to see what I can do. I did a simple block letter outline for FROG which stands for Fully Rely On God. The frog was made with basic shapes. The flourish is my own design too.
I tried to ink the copper a little to help the engraving show up better. The picture isn't the best.
I hope you have a chance to try some new things with whatever cutter you might be using. I love all the new mediums I have done since working with digital die cutting. So FUN!

Tuesday, May 15, 2012

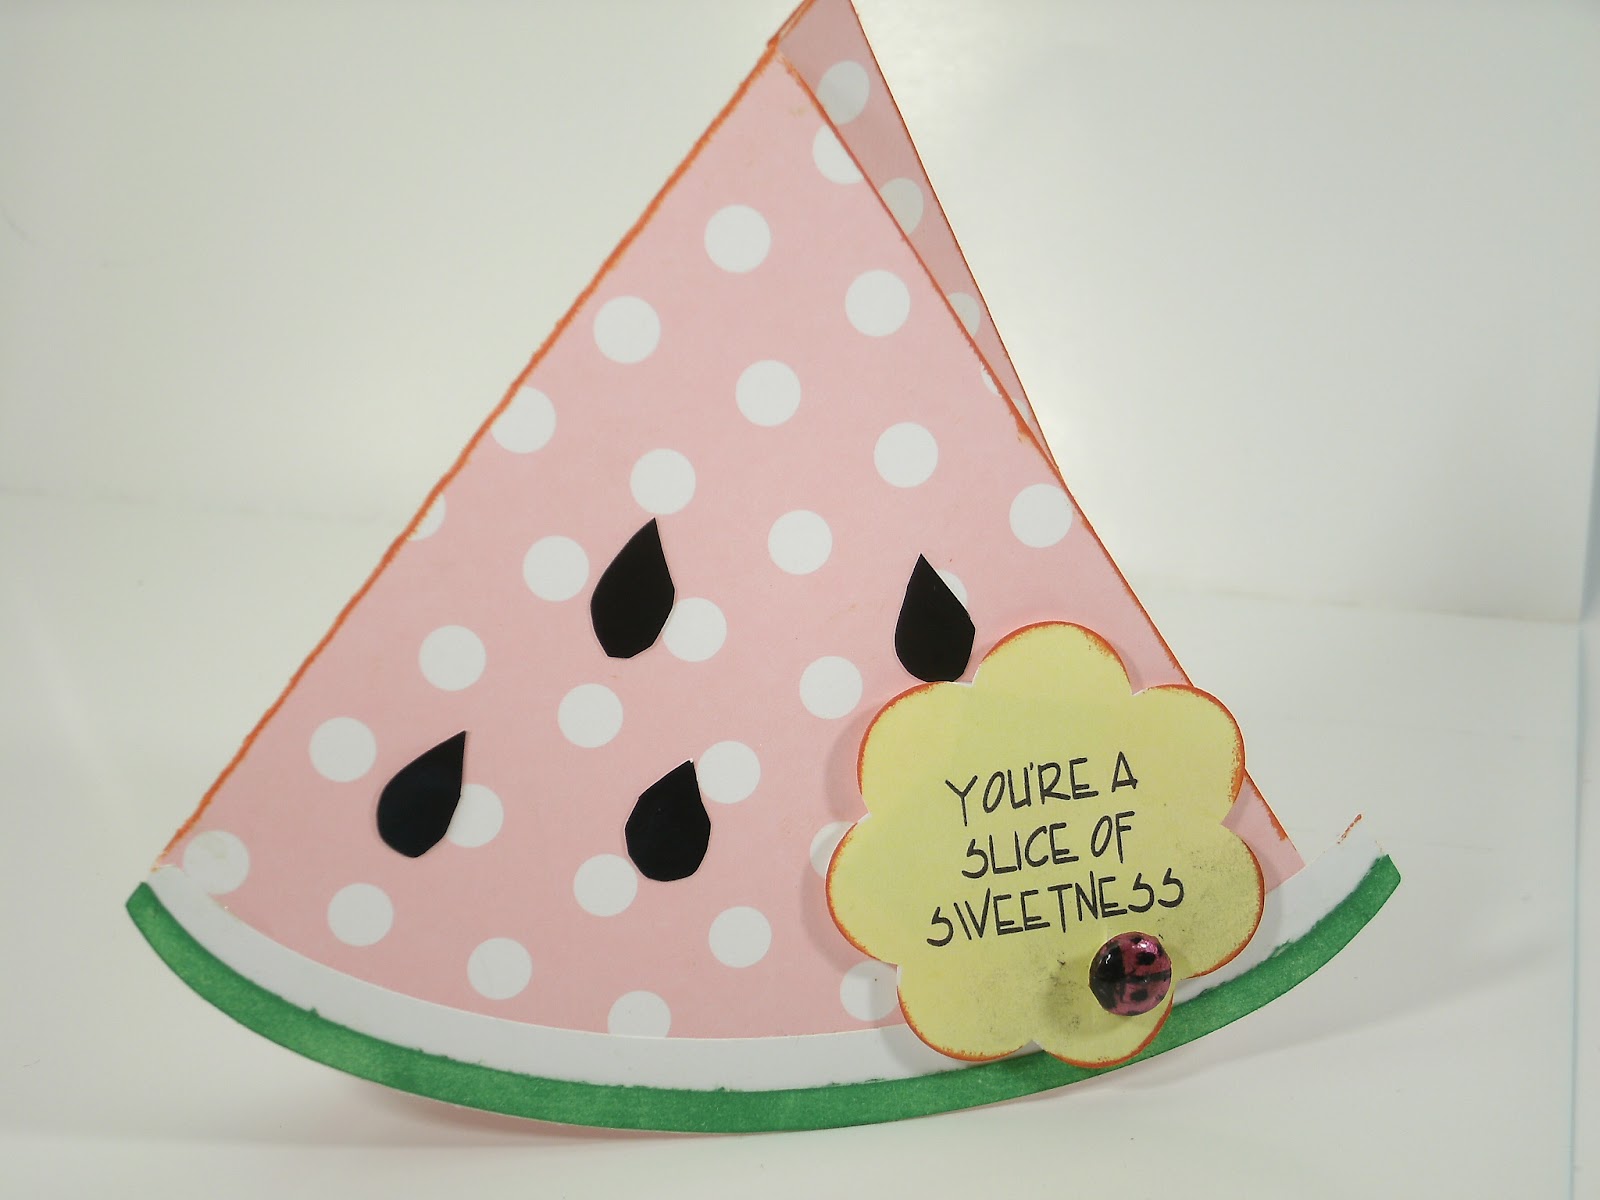
A slice of sweetness

Getting in the mood for summer I wanted a little card that could fit about any occasion. I made this watermelon card with a cute sentiment in Make-the-Cut. 
To make the cute little lady bug I covered a brad with pink fingernail polish and sharpied the spots. I then coated the brad with a clear polish to protect it.
The card was all made with basic shapes in MTC and cut on my Zing. The pink polka dot paper is from Recollections.

Friday, May 11, 2012

Triple easel heart card

So when I was surfing the web I came across this beautiful card and knew I could make the cut file in MTC. I found it at bestofbetsys.blogspot. I have included a few different views so you can see how it is layered. What I love is that it can lay flat for folding and then stand up for display. She calls it a triple easel card. Here is my version. I am giving this file away through Sunday this weekend to all my followers.. Please see the bottom of this post to see how you can get it.

The rose is made from fabric. The side view shows how the card tucks into itself and folds flat. The tip of the heart rests in the top of the heart in  the one in front  of it.


I hope you can tell how it works. The key when you put this together is to know to only glue the front of each heart to its easel part is to glue the lower third of the heart below the score line. And you can add some double stick tape to the very tip top of the heart shape above the other score line which will adhere the easel part to the base of the card.


The sentiment of from mythoughtsexactly The little dictionary word is a freebie from the scrappincop .

  Here is the final display.


I hope you enjoyed the card and the concept.


Edited to add some instruction:
I'll try to explain where you glue the parts. There will be two cardstock hearts that you glue together on the bottom third in each size. The one with the scorelines goes in the back. The very top flap made by the score lines will be adhered to the base of the card. If you look at the very first picture, you'll see that they lay stacked with the smallest under the mid-sized and the largest on top. The largest scored heart will be adhered to the largest heart which is the card base. I cut two and sandwiched them to make it more sturdy. It adheres at the very top. You can use double stick tape so you can move them if you need to reposition until you get it figured out. The mid -sized scored heart will go about 2 inches in front of that one and the smallest scored heart will go about 1 1/2- 2 inches then in front of the mid-sized heart. Let me know if you are still confused. Look at the side-view on my blog and that will help with positioning.

Here's is a visual aid.

Thursday, May 10, 2012

MTC challenge

Just a quick project I want to share which is from the MTC challenge this week. Our designer feature is Charity at AdamsAcres. You can find the challenge here:MTC forum

and get the file for free using our special MTC discount code. She is also having a sale. You can find that info in the challenge post.

The card was for a Mother's Day card. but I was done with those. I just changed the sentiment so I can use it for a grad card for one of my awesome students!

I hope you get a chamce to join in the challenges. We have prizes twice a month.

Thanks for stopping by. Be sure to come back this weekend for a really awesome card I will be posting tomorrow.

Tuesday, May 8, 2012

Teapot card

I wanted to share a card I did for my mom for Mother's Day. I am a tea drinker. My mom drinks both tea and coffee. Having tea is often a special event with friends, so any time is a good-for-tea time. Maybe I am subliminally connecting to my English roots. =D

The paper is DCWV All Dressed Up and one of my all time favs.

Happy Mother's Day to any moms who happen to come by to visit. I have four kids, so I probably have too many stories to tell for my own good. Kids keep me humble. 

Blessings,
Trish (Ima Cutter)